Tried and Tested by Yolandie Olech
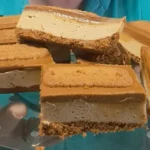
Some desserts look impressive but are secretly the easiest to make. These No-Bake Biscoff Cheesecake Bars are one of them.

Why You’ll Love This Recipe
 No baking required
- Uses simple pantry ingredients
- Perfect make-ahead dessert
- Loaded with creamy cheesecake & Biscoff flavor
Equipment I used:
- Hand Mixer
- Baking Perfect
- Setting Container (glass 20cm Square Bowl)
- Fridge for Setting
- Electric Chopper (or use a zip-log bag and crush with a cup)
- Microwave for melting butter and biscoff spread
Ingredients:
Base:
- 220g or 26x Lotus Biscoff biscuits (crushed) (save the rest for decor)
- 80g melted butter or 80% margarine
Filling:
- 2 x 250g medium fat cream cheese (room temperature)
- 120g powdered sugar (icing sugar)
- 200g Biscoff Smooth Spread
Topping:
- 200g Biscoff Smooth Spread (melted for drizzling)
- Biscoff biscuits for garnish (left over from the pack)

Instructions:
- Make the base:
- Prep your square glass bowl with baking paper and set aside.
Crush your Biscoff biscuits either with the electric crusher or placing the cookies in a zip-log bag and crushing them with a mug, melt the butter or margarine and Press firmly into the bottom of a lined square pan. Chill while you prep the filling. - Make the cheesecake filling:
In a bowl, beat the cream cheese until smooth. Add the powdered icing sugar and Biscoff spread, and mix until creamy and well combined. It will become almost light and fluffy. - Assemble:
Pour the filling over your chilled base and smooth it out. - Top it off:
Place the rest of your biscoff spread in the microwave for about 1 minute (usually they come in 400g tubs, using half for the filling and the rest for the topping), pour that melted Biscoff spread on top of your filling and spread gently. Add whole or crushed Biscoff biscuits as a topping, I used some left over cookies I had to place the full ones, but crushed will look just as delicious - Chill, Cut and Serve:
Place your bowl in the fridge and let sit overnight if you bake after work hours like me or at least 3 hours to have it set up. - I placed my knife into boiling water or in front of my kitchen torch to warm up, it makes the cutting so much easier!
- Cut into bars into any size you feel like and enjoy every bite of Biscoff heaven!

Tips:
- Chill overnight for clean, sharp slices.
- Use parchment paper for easy lift-out.
- Add a pinch of salt to the crust for contrast.
- In one batch I even poured over some Biscoff Ice-cream spread to take it over the sweetness Top!
Watch the Video:
Comment & Share:
If you’re a Biscoff lover, don’t forget to leave a comment below and let me know if you’ve tried it! Share it with your dessert-obsessed bestie or tag me @yolandieolech if you make it — I LOVE seeing your creations!
Can’t wait to see what you do!!
See you in our next Quick Sweet Treat, might be a cake or another quick and easy recipe.
With All My Love
Happy Baking
Yolandie Olech