Baked and Shared by Yolandie Olech

This Banana Chocolate Mousse Cake (made with a simple box mix) is one of those “looks fancy, tastes bakery-level” desserts that no one believes started with a packet cake mix.
It’s soft banana-flavoured layers, filled with a light chocolate mousse, and finished with a rich, creamy texture that melts in your mouth.
Why you’ll love this Banana Chocolate Mousse Cake:
- Made with a simple box cake mix (beginner friendly)
- Moist banana flavour baked into every layer
- Light and creamy chocolate mousse filling
- Perfect celebration or birthday cake
- No complicated baking techniques required
Many of us are so busy, even thinking about making a cake from scratch just instantly drains energy. If you don’t bake a lot, the fear of failure is sometimes so overwhelming, not even thinking about if you have a stand mixer and the right tools, the last thing you think of is buying a box mix because of the bad wrap it gets for being dry and tasting bad.
Well not anymore…what if I tell you, you can bake a box cake, using barely any fancy tools and still have a delicious moist cake your family and friends would never guess that it was a box mix!

By using a few tips and tricks you absolutely can!
So What Ingredients Do You Need Extra:
With the box mix you are asked to add 3 eggs, 250ml Oil, water and instant coffee.. this is a great box mix and you can still make it just the way it is, but true to my nature I like to Change things up, and if you are a South African and used to watch 7de laan… well I am the Hilda in this story, I just never stick to a recipe the way it is written… and with this box mix, it is no exception.
I am not only adding more Eggs and changing up the water for buttermilk. I am adding Banana and our filling is going to be chocolate mouse!!!! CAN YOU EVEN IMAGINE.
What Cake Tin Should I Use:

For this cake, the box mix suggest using 2 x 20cm or a sheet tin or even a brunt cake tin, but with the added banana’s I felt I needed another tin and it came out perfect using 3 x 20cm tins. My batter filled the tins with about 560g of batter each.
Here’s what you’ll need for the cake:
- 4 large eggs (room temperature is best)
- 1 cup vegetable oil
- 4-6 medium smashed bananas (don’t use fully black bananas, but aim for something between that and a few spots).
- 1 cup buttermilk (Milk with lemon juice will do just fine too)
- 2 Teaspoon Coffee Granules
- 650g box Chocolate cake mix (I used Ina Paarman’s Chocolate Cake).

Here’s what you’ll need for the Filling:
The filling needed to be easy and instant like the cake, that is why I choose Michelle’s Quality Baking Goods (I used half the pack I bought)
- 150g Cold Water
- 100g Full Cream
- 250g Chocolate Mouse Mix
Method: Add the cold water and cream into a mixing bowl. Add the Mouse Mix and blend for 1 Minute. Use the hand Mixer if you can and mix for 5 minutes at top speed. You can use the hand whisk too, just might take a bit longer. It should be ready to use immediately. In our case, our filling for the cake!!

Here’s what you’ll need for the Frosting:
- 700g Icing Sugar
- 500g Butter or Margarine (80% to Full Fat)
- 30ml / 2 Tablespoon Full cream milk
- 60ml / ¼ Cup Cocoa Powder
- 2 Teaspoon Vanilla
Method: Add the icing, cocoa room temperature butter or margarine together and mix on a low speed, adding the milk and vanilla until combined. Then put the mixer on full speed and mix until light and fluffy.

Now Let’s Put It All Together.
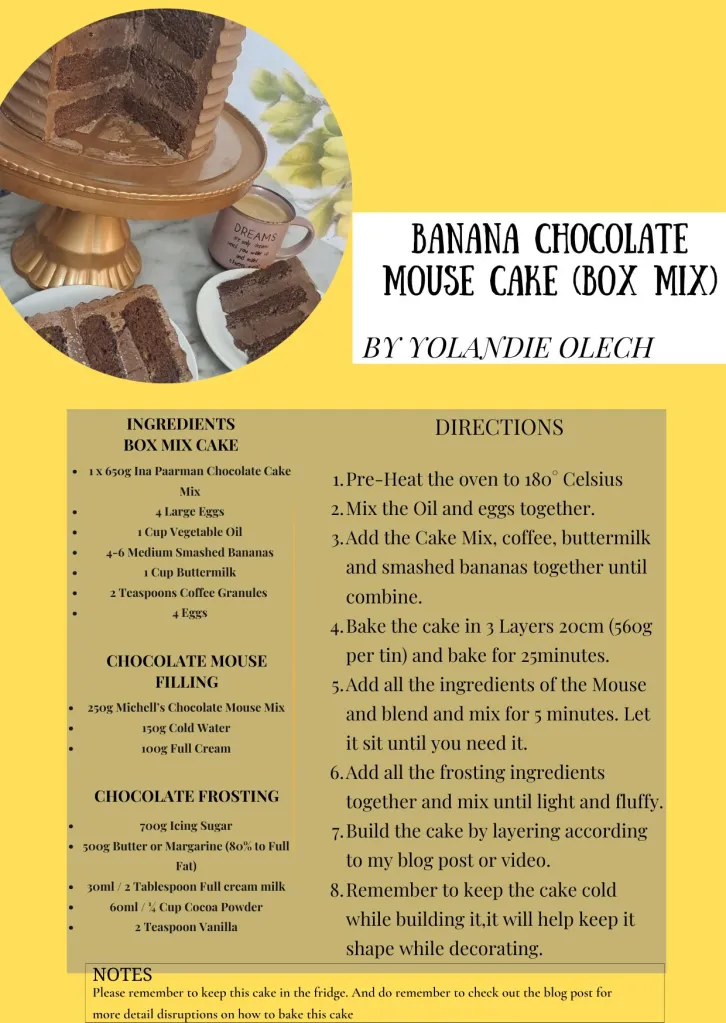
Down below is a recipe card in form of a Picture, you can open and save it straight to your phone for later too.
Cake Method:
Step1: Turn the oven on at 180° Celsius.
Step2: Generously Use some non stick spray or butter or line the cake tins with some baking paper.
Step3: Smash your bananas with a fork and set them aside.
Step4: Beat the eggs and oil together for 30 seconds on high speed with your stand mixer or just with your hand whisk.
Step5: Add the cake mix and coffee granules until combined. Do not over mix the batter at all, gently fold together.
Step6: Now add your smashed up bananas and buttermilk and once again, do not over mix, just fold together until the batter is combined and you no longer see any flour patches.
Step7: Bake for 25minutes and test the cake by pushing a thin knife or toothpick inside the center of the cake, if it comes out clean or the cake pulls away slightly from the side of the pan, the cake should be ready.
Step8: Leave the cake stand for 5 minutes, then flip it out on some cling film and leave to cool of put the cake inside the fridge or freezer for later use once it is completely cooled down.
Step9: Once you are ready to put the cake together you can make the filling if you haven’t already and start building this delicious cake.
I have made a quick Video of how I stacked, filled, coated and put this cake together if you would like to go and check it out.
Method to Build the Cake for Professional Finish:
- Start with the first layer onto your plate or cake board, make sure you add a little frosting to the cake board or plate before placing down your first layer.
- Add a wall of frosting around the cake layer to keep your filling inside.
- Inside that wall, put half of the chocolate mouse mix and smooth it out to make the layer level.
- Add the second layer and be careful not to push too hard down or you will risk spilling out the filling.
- Repeat the steps you did again, adding a frosting wall and the last of the chocolate mouse.
- Put the last layer on and before you add the crumb coat, I put my cake in the fridge for 20 minutes or freezer for about 10 minutes just to make sure it is a bit more set to work with.
- Add a thick layer of frosting around your cake after setting and decorate it in any way you feel like.
- For my Decorating I used my Textured Acrylic Scraper that just made that layer around my cake looks beautiful. A few Ice cream swirls of frosting on top and you have a beautiful Banana Chocolate cake with Mouse filling to serve your guests or family.
- Make sure you keep this cake in the fridge until you need to serve it.
💡 Pro Tips Section
📌 Optional Upgrade
Serving idea:
Perfect with coffee, birthday parties, or weekend baking.
Storage:
Keep refrigerated for up to 3 days.
Let me know if you would like this cake in the comments down below, and if you do try and bake it and need help, just let me know down below too.
Once made, I would love to hear what you think! Maybe this is your new favorite or maybe you just don’t like this one as everyone is different and so are our tastes!!
Thank you for sticking around and make sure you subscribe to my blog if you would like to see what I bake next.

Until next time. Keep Safe, keep strong and Keep baking
All My Love
Yolandie