Baked and Shared by Yolandie Olech
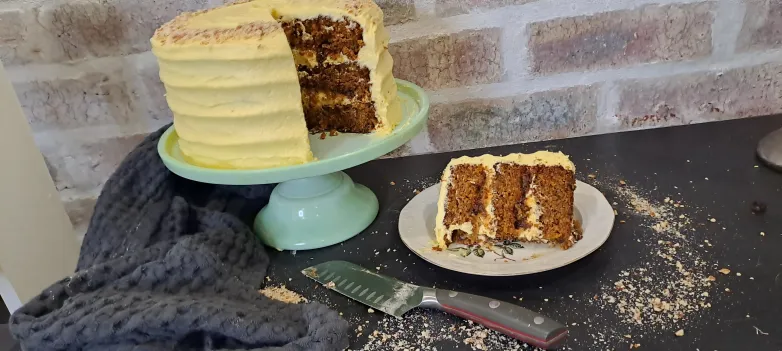
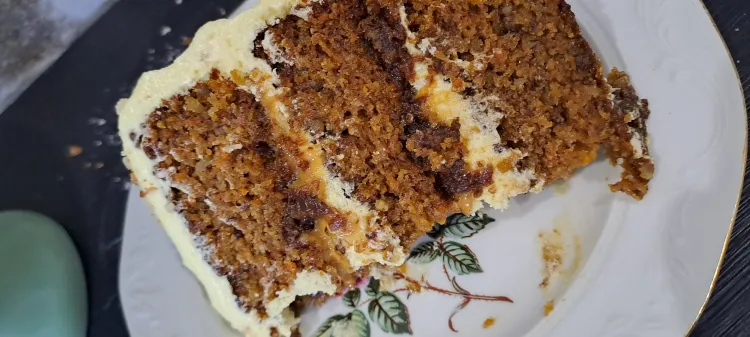
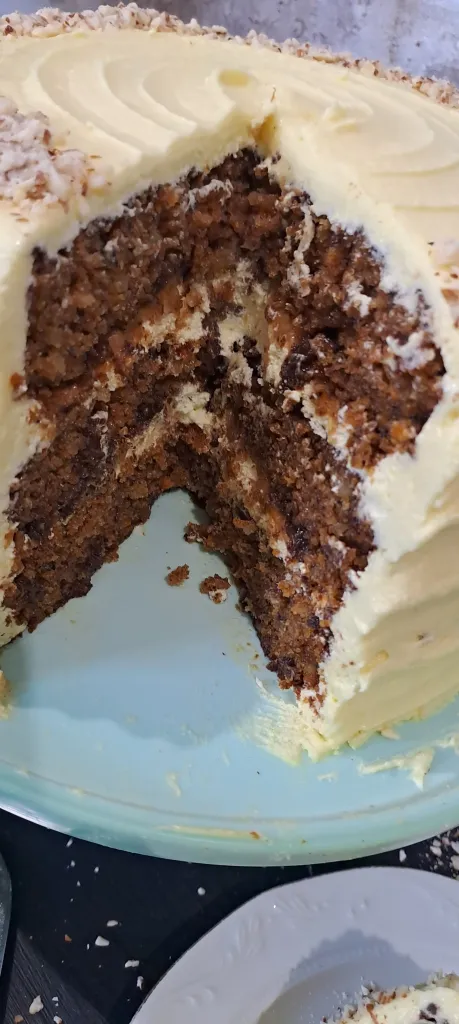
Carrot Cake with your almost traditional spices of cinnamon and cloves, added flavors of pineapple, raisins and Almond nuts. Cream Cheese frosting with a light pineapple syrup note, together with finely chopped almonds and caramel as a filling.
Revamping a already spectacular carrot cake
So I know a lot of people who don’t like carrot cakes, with some having good reasons, the taste of spices are not their thing, or the big pieces of ingredients are just gross together. Years ago I already created a Decedent Carrot Cake recipe which I really loved baking and got some amazing feedback from too, it had added coconut and pecan nuts, cinnamon spice and also a cream cheese frosting. But that being said, I am not a big fan of the taste of pecan nuts and the grating of carrots, oh my goodness such a huge time consuming thing, but worth the effort when the cake was done.
Then the other day a friend came to me telling me about this amazing carrot cake her sister made over the course of Easter Weekend and that I need to make this in cupcakes as soon as possible. I was intrigued by her excitement as she doesn’t like carrot cake, so I accepted the challenge and made them. The original recipe was from Haley Parker The Domestic Rebel, and man was my friend right!! The cupcakes came out absolutely mind blowing delicious!! And my mind immediately went racing with some revamping as I always find myself doing. So Thank you Haley for giving me an amazing recipe to start off with, and for my friend and her sister baking and sharing this with me.
Why I Decided to Create My Own Version & Also Use The Exact Recipe For Cupcakes Too!
(If you choose to bake cupcakes instead…use the exact same recipe method. I got about 24 cupcakes from this recipe, Your cupcakes will depend on the size you chose, pour them at three quarter full, and bake for 20minutes at 160 degrees C)
PLEASE FEEL FREE TO ASK ME ANY QUESTIONS IF YOU NEED ANY HELP BAKING THEM)
So you are probably wondering why on earth would I try to recreate something that was already so perfect to begin with? Well my friends It is just the way my mind works, laughing at myself, I truly just can not help myself, I always see ways to either try and improve something and the habit just also passed over when I am baking, since I can remember It has always been a thing even my mom did not understand “why would you go and do that now?” “Why would you want to change it?” haha come to think of it, I could never give her a solid answer as to just say “I don’t know…wouldn’t a chocolate version just be great!!” Oh man I must have drove her crazy with me always wanting to change and do things differently, yet she always came to taste my creations while still shaking her head in disbelieve or giving me the all so needed advice of how I needed to do this or that to improve it even more, maybe she also had that habit hehehe.
Don’t worry I got your back with this one, just in time for Mother’s Day and in my next blog post, I will make sure you plan and spread out the steps of making this cake that you will hopefully find it as effortless and easy as I did! See the tool above here? That magic machine was my life and time saver!! It is an electronic chopper and if you have this, it will really really save you so much effort, time and dishes to wash later! I used this with almost all the steps. If you do not have this, I recommend getting it as I can’t live without mine, or even a hand chopper just to help you get those ingredients chopped up small without having to do it by hand.
Now Let’s Talk Filling and Frosting
This frosting is all the greatness from a regular cream cheese frosting with butter, icing sugar and cream cheese, but instead of using cream or milk to get the right consistency My friend’s sister just used the syrup you have left over from draining the pineapple can and I thought it was an amazing Idea!! Why not add the flavor to the frosting too!
The caramel, well that came to me when I was busy decorating the cupcakes and I saw some leftover caramel from the vanilla cupcake fillings and for some off reason just took a spoon full of both the frosting and caramel and I could only see stars after that!!! I quickly took a cupcake and added all 3 together and man I was hooked on the idea. Since I was making the Cupcakes from Heyley Parker’s recipe already, I made half the cupcakes different by just drizzling some caramel over them for my friend and her family to test my theory and the feedback was YES PLEASE! So of cause I did that!
The almonds was a thought because at a previous occasion baking my own recipe I didn’t have pecan nuts so I used almonds and I loved it because personally I do not like the taste pecan nuts have. So I used them here too, but I also think it can be done with walnuts or any other kind you like.
As for the raisins, yes my friends, those little fly like dried fruit, you are more than welcome to leave out if you wish!
So can we bake this already!!!!
Here is what you will need:
Tools If Have:
- Hand, stand or whisk mixer
- Cling wrap (for after baking)
- Baking paper (optional, but help lots)
- Electric or hand Chopping tool (see picture below of mine)
- Baking Tins (I used 3x 18cm)
- Measuring tools and kitchen scale (if you don’t have, I totally recommend in investing asap!)
- Yellow Gel Color (optional)
INGREDIENTS:
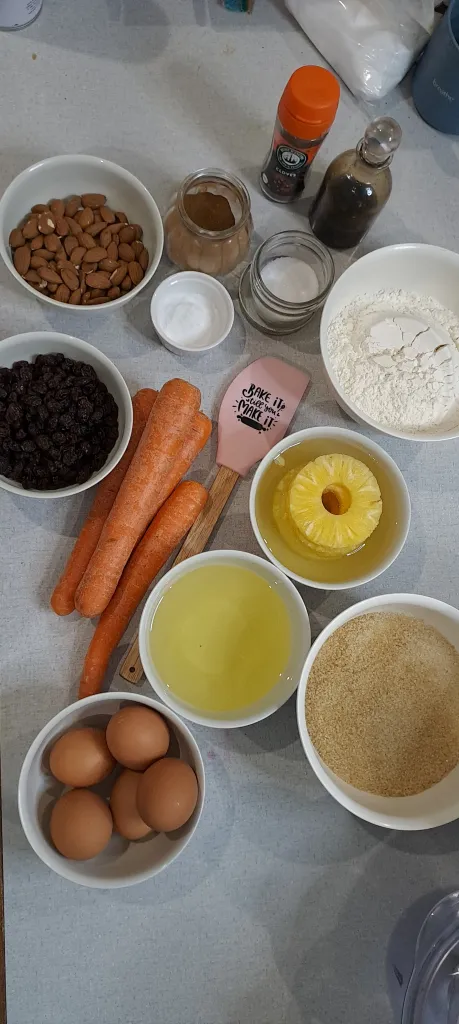
FOR THE CAKE:
- 4 Large Eggs (5 smaller ones can work too if you don’t have anything else)
- 2 Cups Brown Sugar
- 1 Cup Vegetable oil
- 2 Teaspoon Vanilla
- 460g Ring Pineapple in Syrup (drain them but keep that syrup for our frosting later)
- 2 Cups All Purpose Flour (277g)
- 2 Teaspoon Baking Soda
- 1/4 Teaspoon Salt
- 2 Teaspoon Ground Cinnamon
- 1/8 Teaspoon Cloves (my mom used to call it a knife pinch)
- 2 Cups Almonds (+-280/300g) 1cup for recipe and 1 cup for filling and decor
- 2 Cups Chopped up Carrots (+-420g)
- 1 Cup Raisins (optional)
For The Frosting:
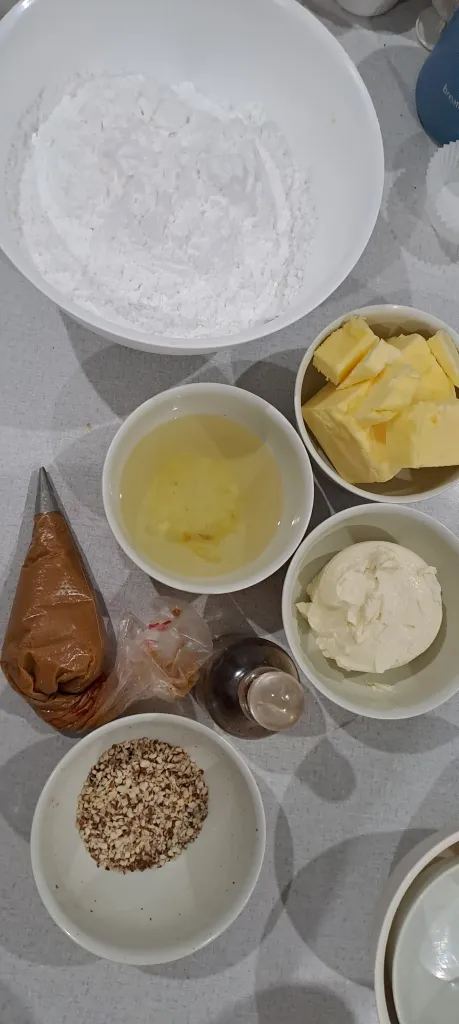
This amount is enough to fill and cover the cake. You may half it if you just want to fill it and leave the rest of the cake “naked”
- 230g Medium Fat Cream Cheese (Room Temperature)
- 250g Salted Butter (Room Temperature)
- 2 Teaspoon Vanilla
- 1/4 Cup Pineapple Syrup
- 6 Cups Icing Sugar (+-800g)
For The Filling:
We already have enough cream cheese frosting for our filling and there will be crushed almonds over too so all that is left now…
- 180g Caramel
Method:
Step1:


Start with preparing your preferred cake tins. I used 3x18cm round tins for a beautiful stacked 3 layer cake. You can use whatever you have available. Just remember that you have to look at the baking times to make sure the cake is not under or over baked.
I love to use baking paper at the bottom these days because they just make extra sure my cake does not stick. Cut out your circles and place them inside your tins. Then spray the bottom lightly and don’t forget the sides too.
Put them aside.
Step2: Prepping our Ingredients

So this little gadget above is my magic tool I love to use in baking and cooking, not only was it quite inexpensive and I get to chop up my whole recipe for easy prepping, you will love this baby when chopping onions! Trust Me! I bought mine so long ago at Checkers, their Platinum Range is really a great place to start, as Platinum is also the First Ever Stand Mixer I bought myself when started out baking.


Start with chopping up those Almonds really Fine, then the raisins if you didn’t manage to get the bite size ones in store. They sadly don’t really go smaller but I do feel the taste came through more when I did chop them up. No Peel the carrots and cut the top and bottoms off (this is the only hard part I found). Continue to do so with the pineapple rings too, remember to drain them and keep that syrup for later.
Step3:

Go on and Start Your oven, I have come to notice everything I bake really needs my oven to be the perfect temperature so let it preheat for at least 30 minutes, even if the light goes off if you are using an electric oven, the gas ones are where I am very strict with that preheat session.
Step4:
Now let’s finally put it all together!


Start by Mixing the eggs and sugar together with either your hand or stand mixer, if you don’t have one it will just take longer but you can totally do this with a hand whisk too (have you seen people mix up cream that way) same principle, just needs patience!
Once they have become a bit lighter in color you may add the oil, vanilla and crushed pineapple then just lightly mix again to combine these ingredients together well.
Step5:


I remembered now that I didn’t even sifted my flour for this recipe so who-ooh we just saved our self another step right here! Add the flour, baking soda, cinnamon, salt and cloves right into the rest of the batter and slowly fold and mix together until you see no more flour lumps and an almost thick paste forms.
Step6:


Lastly and definitely not the least as these are the star of our recipe, you may now add the chopped up carrots, raisins and 1 cup almonds. Remember we leave the other cup for our filling and decoration.
Lightly fold or mix these together until everything is combined, it should more or less look like the pictures below


Which now take us to..
Step7:
I love weighing my bowl at the beginning and then with the batter afterwards to divide my batter more equally so my layers bake up equally as well, but you can totally eye ball this too. I found that 659g in each tin gave me the perfect layers for my 18cm round tins.
and now we are ready TO BAKE!!!!
I baked my cake for about 35-40minutes testing it after 35min to make sure my toothpick came out clear. Remember this is quite a moist cake, so make sure it is under baking you see and not just moist on the toothpick or skewer.


Step8:
After baking time, let your cake just sit for 5minutes to cool down and then drop them half warm onto some cling wrap. Put them in the fridge or freezer this way and you keep that moisture you want. This way you can always bake your cake a day or so in advance and keep it until you need to decorate it. Watch out for my next blog post as I will give you some tips on how to plan your cake baking in advance, so you don’t end up doing everything in one day! Trust me some cakes can sometimes take hours of prepping and decorating, planning is everything!
Now for the Frosting!
Add the icing sugar to your mixing bowl, again a hand mixer will work but it will just take longer as the beating here is essential, for the longer you beat the frosting the fluffier it will become.
Add the room temperature butter and cream cheese too, and on low start to mix them together, add a little bit at at time of the pineapple syrup just to get the consistency going, depending on the climate you can use less or more, so always start with a little bit at a time.
Now remember to add your vanilla too, and once they are paste like and you don’t see only icing sugar anymore, let that mixer go on high and beat the frosting for 5-8minutes until it’s light and fluffy in color and taste. Remember you want melt in your mouth and not sugar tasting frosting.
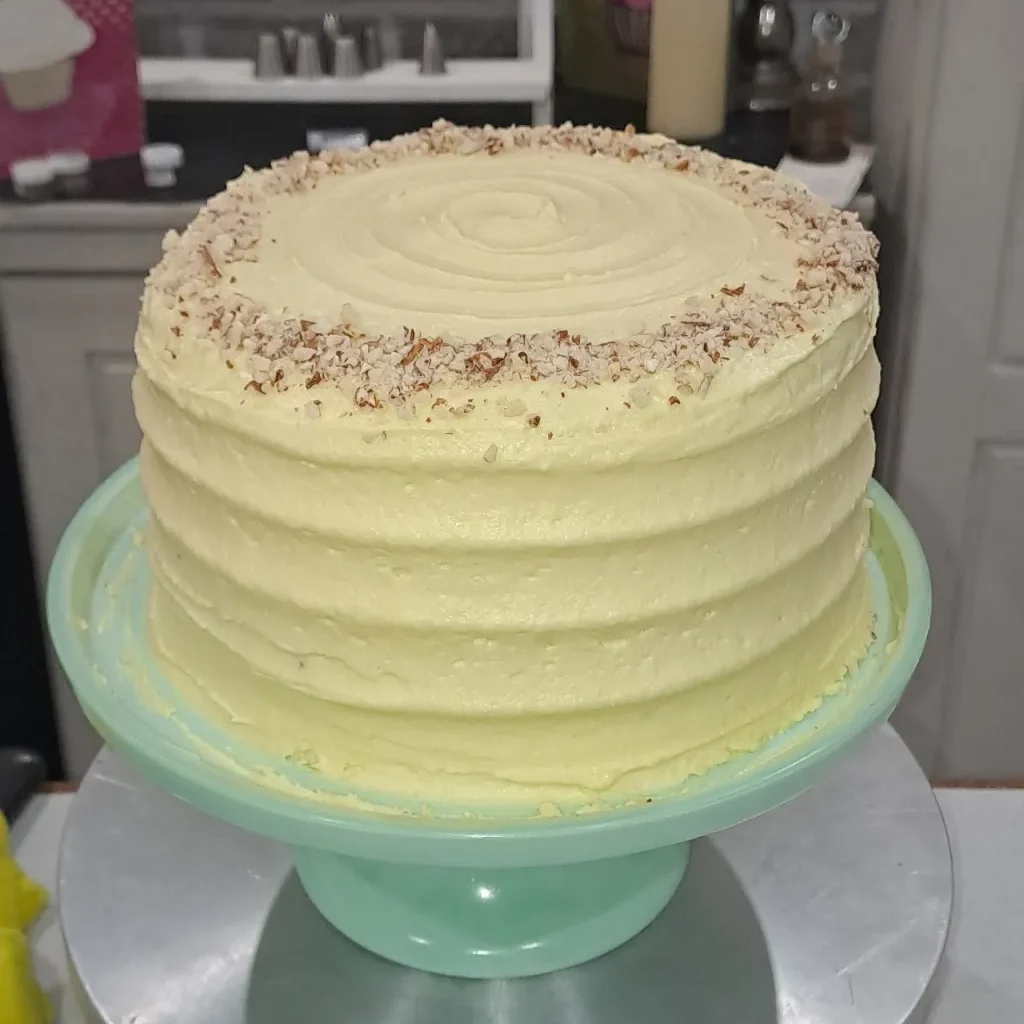
Now you can totally leave your frosting the pale color it is, but I wanted to add a little yellow to mine and used some of Cake Flora‘s Gel Food Color. Right now they are my favorite to use. But just lightly gave me the frosting color I wanted. I added about 2 drops to my frosting.
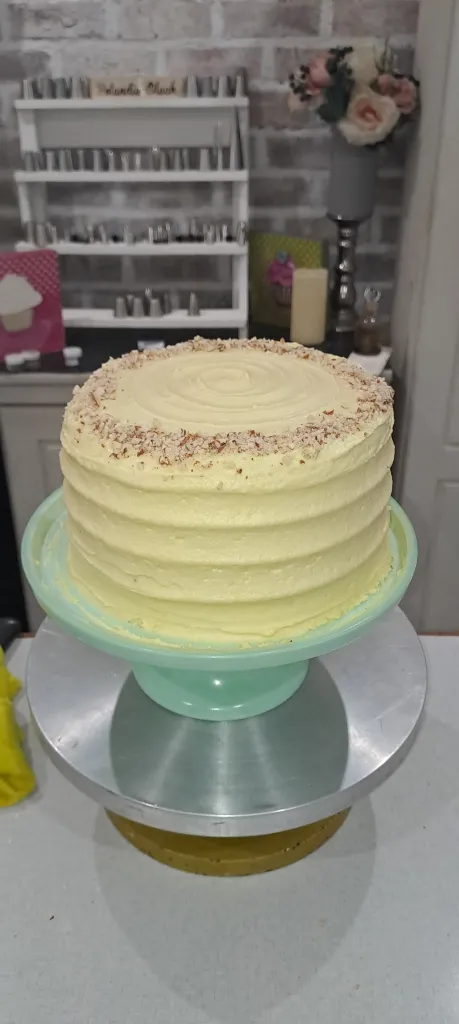
Assemble:
When you are ready to put your cake together it will go more or less like this.
- Place one cake layer on your cake board or plate, you can even put a little frosting on the plate so it won’t move around.
- Add a thick layer of frosting
- Then Sprinkle on a layer of Crushed up almonds
- and Drizzle the almonds with caramel after that (use a bag or piping bag, snipping a small opening)
- Place your second layer and repeat the steps above.
- Now you cover your cake in a thin layer of frosting and put it into the fridge for at least 30 minutes to set up (see where times come in) but trust me it is well worth it
- If you want you can just leave it this way and add the remaining almonds as decor at the bottom or top of your cake or
- Give it another thick layer of frosting and use a shape scraper like I did to create that cute round stripe shapes around my cake (you can email me at info@yolandieolech.com if you want to know more about my range of scrapers and cake disks) I just love them so so freaking much!
- Now I was ready to add that decor of almond around the top of my cake and place it bake into the fridge until it was time to drive or eat it.
I will be making a video very soon on YouTube of How I assembled my cake but just had to give you the recipe so long!

And that is it my friends! Oh my goodness I can not wait for you to try it, please let me know what you think of it or if you have any questions, leave them in the comments below and I will get back to you as soon as possible. If you managed to baked it, please tag me as I would love to see what you created.
Thank you so much for trying or even just reading my recipe, every one of you make a difference in life!
Remember to stay Strong and Stay Safe! Until our next baking adventure.
Loved this recipe? PLEASE SHOW YOUR SUPPORT BY LIKING AND SHARING MY RECIPE IT WILL REALLY HELP ME OUT
Follow me on TikTok, YouTube and Instagram for the decorating videos — and explore my baking guides in my shop.
All my love
Yolandie
